Tuesday, December 3, 2013

Faux-Frosting Cake Decorating Sampler

Every term my Bakery students work so hard to create an awesome cake, only for it to be ultimately eaten. This term, as an assessment of their piping skills, they will be making a sampler from spackle that will keep forever!

I have drywall joint compound left over from a home remodeling project, but you can get it in a small container from any hardware store.  I thickened mine slightly with flour to make it the right consistency for piping.  Add flour very slowly because you can't take it back!

For the assessment each student must include:
  • Scripted first and last name
  • Shell border
  • Star fill
Remember, of course, that spackle is not food-safe.  You should use disposable pastry bags and an exclusive set of tips.

Thursday, November 28, 2013

Happy Thanksgiving 2013

Happy Thanksgiving, all! I'm headed north to visit my family for the day. My husband and I missed the get-together last year because we were on a mini-honeymoon.
Here's a picture of the crew taken just one year ago at our wedding. At the top of my annual thankful list is my awesome, laid back family that makes the holidays enjoyable instead of stressful. I'm also thankful...

  • That I'm not only employed, but that I'm employed in a career that I love working with students I love
  • That I'm married to an awesome husband who takes great care of our family and home
  • That I have two awesome dogs who have turned me into "that" annoying person who counts dogs as family members
I hope you are too busy enjoying your break to read this Thanksgiving-day post! In that case... Welcome back! I hope your few days off work have you excited to be back instead of counting the days to Christmas.

Wednesday, November 27, 2013

Beware of Fad Diets! Class Bulletin Board

This year my Food and Nutrition students collaborated with our school nurse to do a bulletin board about fad diets. After learning about what a balanced plate should look like (according to USDA guidelines) students researched a fat diet and drew what a plate would look like.  Needless to say there was not a lot of balance!
We posted the plates and fad-diet tips on the bulletin board near the nurse's office with MyPlate pictures that I cut from free hand-outs.

You can download the fad diet tips here and the fad diet research worksheet here.

Tuesday, November 26, 2013

Paula Deen Pumpkin Bars Healthy Overhaul

PumpkinsNo Paula Deen recipe would be complete without lots of added fat! That's why this pumpkin bar recipe from Food Network made such a great subject for our healthy substitutions lab.

This lab works great with five student groups.  Each kitchen makes a different recipe. The recipes in my materials are not labeled, so refer to the following list:
  1. Original recipe
  2. Add fiber with whole wheat flour and ground flax seeds
  3. Cut sugar and add extra flavor with cinnamon
  4. Cut fat by reducing oil using egg whites
  5. Overhaul: Use all of the healthful substitutes in a single recipe

View My Materials

Whenever I'm trying "healthy" versions of recipes students can usually pick out the original.  I give them this scenario:
Imagine you walk into Mentors (homeroom) and your teacher has prepared pumpkin bars for you and your classmates.  Do you say "No thank you, those are far too healthy," or do you say, "YES! FOOD!"
Every high school student I know says "YES! FOOD!" I never have to worry about leftovers. :)

Monday, November 25, 2013

Rolling Pinz Bakery is Open For Business!

After much hard work, my Bakery students are proud to announce the opening of their take-and-bake cinnamon roll business!

Saturday, November 23, 2013

Ms. Pins' Monster Cookies (Vegan, Gluten-Free)

In the past year I have adopted an animal-product-free lifestyle, and after last week's yeast bread unit I am reminded of how much better I feel without wheat as well. This is quite a let down for the upcoming holiday season. My mom is a fantastic baker and I can't imagine a celebration being the same without her goodies!

Last weekend I set out to create a gluten free, egg free, and dairy free version of our family's favorite monster cookies.  After a lifetime growing up with my mom's cooking "veganized" versions of foods are usually a let-down.  I can proudly report that these cookies were AWESOME and even passed the husband taste-test.

The recipe uses chia seeds as the emulsifier and oil as the fat instead of eggs and butter. I chose tapioca flour to replace the wheat flour because it is slightly sweet and is a good thickener. The resulting cookies have a crisp bite but are still chewy, just like an oatmeal cookie should be!

Ms. Pins' Monster Cookies
A gluten free, egg free, dairy free version of the cherished Mrs. Kramer Monster Cookie recipe

Ingredients:
  • 1/2 C almond milk (original, unsweetened)
  • 2 T chia seeds
  • 1/2 C vegetable oil
  • 1/2 C granulated sugar
  • 1/2 C brown sugar
  • 1 C peanut butter
  • 1 T apple cider vinegar
  • 2 T tapioca flour
  • 2 t baking soda
  • 2 1/4 C quick oats (People very sensitive to gluten should use certified gluten-free oats due to cross contamination risks)
  • 1/3 C each raisins, walnuts, and coconut or 1 C total of your choice of add-ins
  • 1/2 C powdered sugar

Instructions:
  1. Preheat oven to 350 F.
  2. Mix together almond milk and chia seeds.  Allow to sit until thickened slightly; about 5 minutes.
  3. Cream together chia seed mixture, vegetable oil, sugars, peanut butter, and apple cider vinegar.
  4. Sift in flour and baking soda. Mix well.
  5. Stir in quick oats.
  6. Fold in raisins, walnuts, and coconut or your choice of add-ins.
  7. Drop dough by tablespoons full into powdered sugar. Roll in powdered sugar and place on ungreased cookie sheet.
  8. Bake in middle of oven for 10 minutes.  Allow to cool on sheet for about five minutes before transferring to a wire cooling rack.

Monday, November 18, 2013

Advertising Logos and Slogans

Coca-Cola logoI did this advertising logo and slogan activity with my students to kick off learning about "Product" in the 4 P's of Marketing.

I searched far and wide to find my favorite worksheets so that I have three each of logos and slogans.

Logos:


Slogans:

I make three different worksheets, each with a logo side and slogan side.  Students work individually before rotating papers with table mates.

The students have a lot of fun with this.  It's amazing to see how well they do!

Thursday, November 14, 2013

Yeast Bread Activity with Modern Marvels: Bread

Wheat harvest
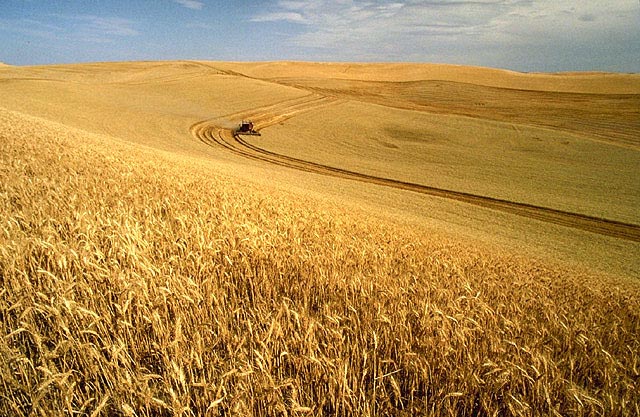
I like to show Modern Marvels: Bread to my Bakery students because it gives so much historical information on bread that I could never cover.  It also demonstrates sourdough and Challah, which we do not have time to make with our limited class time. 

There is a fine line between teachers using videos to enhance their lesson and using videos to replace their lesson.  As someone who watched Kindergarten Cop in elementary music and Field of Dreams in eighth grade health, I want to be sure that I stay on the right side of the line.

That's why I kept my students busy making bread while learning about bread.  Everything in this recipe is made in a heavy-duty gallon freezer bag which means minimal mess.  It is a good activity for classrooms with no real kitchens.  Bread could be baked in the cafeteria ovens.

If the $20 price tag for a new DVD is too much for your department to handle, I highly suggest using Amazon instant video. This episode of Modern Marvels: Bread cost just $1.99.  Instant video is super handy when you're watching TV and think I wish I had recorded this! This is exactly what my students should know! 

Modern Marvels: Bread

Bread-In-A-Bag


2:45 “First, sugar, yeast, and flour are mixed with water into a one thousand pound ball called a sponge.”


In a one gallon (heavy duty) Ziploc bag, mix:
  • 1/2 cup flour
  • 2 teaspoons yeast
  • 1/2 cup warm water
  • 2 tablespoons sugar


Close bag and knead it with fingers until the ingredients are completely blended. Leave bag closed and let rest.


9:50 “Across the Kansas State Campus, in the Bakery Science Laboratory, scientists have devised dozens of tests to check the quality of flour.”


Add:
  • 2 cups flour
  • 3/4 cup warm water
  • 1 tablespoon vegetable oil
  • 2 teaspoons salt


Mix well.


Add enough flour to make a stiff dough, about 1 or 1-1/2 cups. Close the bag and knead it, adding more flour until dough no longer sticks to the bag. Leave bag closed and let rest.


20:15 “Wheat may be the basis for most bread, but corn is an American specialty.”


Preheat oven to 350 F. Place glass casserole with 4 C water on lowest rack in oven.


Spray baking sheet with cooking spray and sprinkle with cornmeal.


Turn the dough out onto lightly floured surface. Form dough into round ball, tucking seams underneath. Cut slashes in dough as demonstrated with the San Francisco sourdough. Cover with tea towel and allow to rise.


End of episode

Leaving water in place, bake bread on middle oven rack for 30 minutes or until done. Methods used to test doneness in the video include listening for crunch or tapping for a hollow sound.  A sure way is to see that internal temperature is at least 205 F with an instant-read thermometer.


Wednesday, November 13, 2013

Bring Your Buddy to Work Day

Look at this handsome fellow who played in my classroom after school! This is my six-year-old dog, Tony. He is not "officially" registered as a therapy dog but has been excellent at nursing homes and elementary schools. Tony will be serving as the class pet for students with Autism and will visit every Monday.

The students took great care of Tony and loved having him visit. Tony had the time of his life getting affection from people all day long. He is such a calming presence in my home and I'm glad to have the opportunity to 

Monday, November 11, 2013

How to Make Homemade Bread Crumbs from Fresh Bread

Last term I had to buy bread crumbs for my students to make stuffing.  Seriously.  I paid money for stale bread.

Don't spend your tight budget on stale bread!  Breadcrumbs are simple to make yourself.

Ironically, fresh bread mades the best bread crumbs.  I cut bread from our small appliance bread machine presentation into cubes and baked them for 20 minutes at 300 degrees.

That's it, that's all!  Now the breadcrumbs are ready for next week's Microwave Thanksgiving Lab.

Friday, November 8, 2013

Yeast Bread Vocabulary Quizlet

Woo hoo! Thanks to my awesome student volunteer, yeast bread vocabulary words are up on Quizlet for my students (and you!) to use!

The words correspond with Chapter 27: Yeast Breads and Rolls of Culinary Essentials by Glencoe, 2010.

Thursday, November 7, 2013

Quizlet Vocabulary Review Tool

How have I been teaching for three years without knowing Quizlet existed?!

Yesterday, while I covered a class for a Spanish teacher, students used their phones to add vocabulary words to Quizlet.  Today I explored the tool for myself and discovered that words and definitions can be copy/pasted from a spreadsheet. How cool!

I created and shared a Google spreadsheet with my volunteer and will have her input vocabulary words and definitions.  The spreadsheet can easily become vocabulary flash cards for my students.  For those less tech-savvy, the spreadsheet can just be printed and studied from the "old fashioned" way.

I'm pretty sure that Quizlet can be shared with anyone.  Of course, I will keep you posted and share my sets with you as they become available!

Wednesday, November 6, 2013

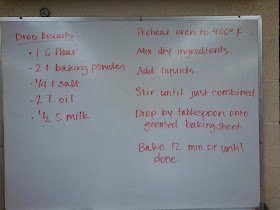
Quick Biscuits Recipe

Food and Nutrition students made this quick biscuit recipe in the time that it took their Knife Skills Soup to simmer.
I like it because the students don't need to know the specifics of biscuit making, like the cutting in method. The biscuits use all shelf stable ingredients so I didn't have to make an extra grocery trip. (I mix dry milk powder as my students need it.)
I encouraged students to make substitutions.  One group did half whole wheat flour, pumpkin instead of oil, and added some honey and cinnamon. They were awesome! It encouraged their classmates to be a bit more adventurous next time.

Tuesday, November 5, 2013

Create Your Own Quick Bread Project

It's that time of the Bakery term for the Create Your Own Quick Bread Project!

This activity builds on the Basic Ingredients unit.  Students use a ratio formula to create their own muffin recipe.  They evaluate the muffin and change their recipe based on their knowledge of ingredients.

When they have finalized a recipe they produce a finished product and "advertise" it with a 30 second or 1 minute commercial. Their commercial markets the muffin based on flavor, appearance, color, and texture, and includes a calorie count and cost-per-unit.

Students have quite the complex rubric to follow which you can download here.  They just made their final products muffins yesterday and the results are delicious! Student favorites include the Pear-Walnut, Nutella Espresso, and Sweet Bacon. I look forward to watching their commercials tomorrow.


Monday, November 4, 2013

QR Codes for Absent/Missing Work

Although I have yet to figure out the QR code reader on my smart phone, my students love them. That is why I am utilizing QR codes to relay absent and missing work to students.
I made this poster for my classroom using this QR Code Generator.  Each code takes students to the corresponding page on this blog.  As you know, each page has a link to the class outline which in turn has links to most class content.

You know, back in the day, I didn't get a cell phone until I was a senior in high school. Even then I didn't have text messaging. My, how times have changed! We also had these light-up box things called "overhead projectors." ;)


Friday, November 1, 2013

Complement Your Family and Consumer Sciences Lessons with "Good Eats" Episodes

I would be hard-pressed to meet a culinary arts teacher who does not love Alton Brown's Good Eats.  It is a fantastic collection of 20-minute lessons on specific food science concepts.  Each episode goes in depth on a specific technique, trend, issue, or food.

Even my hyperactive self cannot match Alton Brown's passion for culinary arts, so I integrate episodes into my curriculum.  In addition to being spoiled rotten with fantastic administration, students, and block scheduling, my department owns every episode on DVD! My favorite episodes include:

  • The Dough Also Rises
  • The Muffin Method Man
  • American Slicer
  • Choux Shine
  • ...and many others, although I watch most of them for just my personal enjoyment.
An invaluable resource is Good Eats Fanpage.  The website lists every episode by topic and links to a version on YouTube.  It also includes a transcript of every episode, which is handy to refer back to during demonstrations.


As much as I love Good Eats, I suffer severe my-students-are-sitting-still guilt if I show videos too often.  That's not to say I can't binge-watch in the comfort of my own home!

Thursday, October 31, 2013

Demonstrate Basic Baking Ingredients with a Simple Pancake Lab

This simple pancake lab was a nice transition between our Basic Baking Ingredients and Quick Breads unit.

Each of four kitchen groups were given the same pancake recipe but omitted a different ingredient.

Eggs, 
 leavening agent,
 liquid,
 and flour.
Then I demonstrated basic quick bread method to make a standard batch of pancakes.  The students compared each of the "pancake" batches to evaluate the importance of each ingredient.

You can download the recipe and reflection sheet here.  I used the reflection as the assessment for the Basic Baking Ingredients unit. It makes a great foundation for the next unit when my students will create their own muffin recipe.

Monday, October 14, 2013

Whole Grains and Beans Snack Food Lab

Last week students prepared a variety of whole grain and beans snacks:
 Cowboy Caviar,
 

The students loved the lab, especially the cookie dough dip.  I edited the recipes to suit my class size and level (Download my copies here).  It was a good way for my student to practice their knife skills.  My students don't know it yet, but they will be preparing fried rice for their final lab.  This whole grains and beans snack food lab is a great review.

Friday, October 11, 2013

Family and Consumer Sciences Classroom Composting

CompostHave you read this article about school wide composting? As a Family and Consumer Sciences teacher I have lots of food scraps to dispose of. Compost saves twofold.  First, the food scraps are not sent to the landfill where they will produce methane gas that contributes to global warming.  Secondly, our trash can needs to be emptied less often because there is no stinky wet waste. That saves on plastic, and the world would be much better with less of that!

We compost scraps from our food labs in a bin outside of my classroom.  The foods scraps make up the "green" components of compost.  We shred newspaper, paper towels, paper flour sacks, and dryer lint when the pile gets too moist.  It never smells bad as long as we keep the 1-3 green-brown ratio.

I would love to have a school wide composting program but I can't even imagine the scale.  I think a good start would be for the students to recycle milk cartons. Perhaps if there was a dollar value attached to composting, as the article implies, my "powers that be" would be more interested. :)

Thursday, October 10, 2013

Preparing Dry Beans Demonstration

black beansIn preparation for tomorrow's Beans, Nuts, and Seeds lab, I demonstrated how to prepare dried beans today. 

I began by showing a news segment about how to use canned beans. The segment also highlights cost savings of dried beans and the health benefits of beans and legumes.

Students calculate the cost savings of dried beans with a journal entry:

Which is a less expensive option: Cooked beans or dried beans?


  • Prepared canned pinto beans cost $1.99 per can
    • Each can yields about 2 cups of beans
  • Dried beans cost $1.19 per pound
    • Each pound of dried beans makes about 8 cups of beans
  • Ground beef costs $2.98 per pound
    • One ounce of meat= ½ cup of beans
  • What is the cost savings of dried beans vs. ground beef?

I show Pantry Raid III: Cool Beans and demonstrate how to prepare beans along with Alton Brown.  Despite Alton's advice I use the quick soak method.  I also cook the beans in a slow cooker so I don't have to keep an eye on them during my other classes.

We will have a big pot of black beans for whatever tomorrow's beans, nuts, and legumes lab brings us.

Wednesday, October 9, 2013

Whole Grains Preparation Lab

Sunset Oats After students have learned how to make good choices when choosing grain based breads and snacks, I have a lab for preparing whole grains from scratch. Most of the students were familiar with rice but all of the other grains were new to them.

Each kitchen makes a different whole grain.
  • Steel cut oats
  • Quinoa
  • Bulgur
  • Cornmeal
  • Rice
Then each student had a wide variety of grains to taste.  I offer various toppings to make the grains a bit more enticing for the newbies.
  • Maple syrup
  • Brown sugar
  • Raisins
  • Soy sauce
  • Honey
The favorite usually ends up being cornmeal mush. My students like it with maple syrup. I find that funny because older generations wrinkle their nose at cornmeal mush. :)

Whole Grain Labeling Activity

Whole wheat grain flour being scooped
After our MyPlate project I can see that my students need a little more work on whole grains.  They noticed that Poptarts and Oreos counted towards servings of grains and now think they are healthy snack servings.

I start this lesson with a formative assessment to evaluate what students already know about whole grains.  I show the students a collection of bread and snack packaging.  I hold up each item and ask for either a thumbs up for "healthy" or down "unhealthy."  Students are basically guessing based on packaging because they cannot read a nutrition label from where they are.

When the labels are sorted I show a YouTube clip describing the importance of fiber. (HealthiNation is a great channel to follow for quick, informative nutrition clips.)
After a short discussion on fiber I show a clip about choosing whole grain bread.

Using information from the videos I ask the students to read information from the various labels and decide if the food is a good source of fiber and if it is a whole grain.

I have a tendency to grab the most healthy-looking package instead of reading a label to be sure that the bread or product is a whole grain. This lesson plan is a good reminder for me!

Tomorrow we are preparing various whole grains from scratch.  We found out today that the main ingredient in Fruit Loops is indeed whole wheat flour... followed by sugar.  Hopefully tomorrow's lab will create some oatmeal and polenta converts!

Monday, October 7, 2013

Tortilla Toppings Fruits and Vegetables Foods Lab

We celebrated the final day of Homecoming on Friday with our tortilla toppings lab.  It comes right after our nutrition unit and at the beginning of our fruits and vegetables unit.  Too often students think you have to eat lots of lettuce to be healthy.  They don't think that parties and get-togethers are a time to eat healthy food.

Fruit Salsa
Pico de Gallo
Mock-Guac

A class with five kitchens would make two recipes each of fruit salsa and pico and one recipe of mock-guac.  This makes enough for each student (~15 per class) to try a bit of each.

I use it to demonstrate several concepts of preparing raw fruits and vegetables:

  • Peeling a kiwi
  • Peeling and coring an apple
  • Seeding a tomato and jalapeƱo
  • Chopping herbs
  • Cutting an avocado
  • Preventing enzymatic browning
Students also prepare their own tortillas for the lab.  It teaches them to use the broiler on the oven.  It's very easy:
  1. Preheat the broiler.  Move an oven rack so that food will be about 4" from heat.
  2. Spray a baking sheet with cooking spray.
  3. Cut tortillas into triangles (I budget 2 corn tortillas per student).
  4. Place tortillas on baking sheet.  They can touch but not overlap.
  5. Spray tortillas with cooking spray.  Sprinkle with salt, if desired.
  6. Broil for 3 minutes, watching constantly.  Chips are done when they are light brown and start to bubble.
  7. Continue to cook tortillas for 1 minute at a time until all are done.
I am happy to report that this lab is a consistent favorite.  Many of the students ask for copies of the recipe to try at home. 

Friday, October 4, 2013

Homecoming Week Dress-Up Days

It's time for the big football game tonight and the dance tomorrow.  Homecoming week has been a lot of fun! My personal favorite festivity is the themed dress-up days.  This year the cheerleaders picked "M Day," "Grandparent's Day," "America Day," and "Disney Day."

Monday: "M" Day
I wore all of my vintage plaids to be "Mismatched"
Tuesday: Grandparent's Day
Well... My grandmothers were alive in the 1940's so it seemed like a good excuse to wear my favorite vintage dress with the chartreuse heels from my wedding.
Wednesday: America Day
A throwback to my favorite celebrity ever, Rosie the Riveter. 
Thursday: Disney Day
This was a toughie... I found a red bubble dress at Goodwill, cut a hole in the lining, and stuffed it with plastic bags.  I wore a green beanie as a leaf and called myself the poisonous apple from Snow White.

Friday: Red and Gold Day
Just me in jeans and my red and gold Homecoming t-shirt

It was a fun week.  I hope the weather holds out for the game and dance!

Thursday, October 3, 2013

Teach Fruits and Vegetables Classification with Tops & Bottoms: A Caldecott Honor Book


I love using my favorite children's book, Tops and Bottoms, to review fruits and vegetables classification.

It is a fable of a lazy bear and the hare who tricks him into giving up his harvest every year.  Hare tells Bear that he will farm the land, do all of the work, and split the harvest "right down the middle" with Bear getting the tops of plants and Hare getting the bottoms.

I have the students guess what the hare would plant. In other words, what vegetables grow underground? The students list different kinds of roots and tubers.

The book continues with Bear being angry and demanding the bottoms (Hare plants flowers, leaves, and stems) and the next year demanding the whole plant (Hare plants seeds and fruits).

I used to borrow this from the library every year, but now I own it on Kindle.  I downloaded the Kindle for Mac app and now I can project it for all students to see.  The pictures are great and the students really enjoy the book, even though it is for children much younger than them.

Wednesday, October 2, 2013

Alternatives to the USDA SuperTracker Program for Family and Consumer Sciences Teachers

USDA MyPlate greenAlthough I hope to not get too political, let's just say I'm more than annoyed at the United States federal government shutdown.  Over the last week my students have been entering information into the SuperTracker website to analyze their daily eating habits.  Tuesday, when the students were to print their final report, the site was taken down.  This means my students have wasted at least two blocks of valuable class time.

MyFitness Pal is the nutrition tracking program that I use personally. I like it because I can enter information on my phone as well as online (handy for 1-to-1 Ipad schools). Instead of being based on food groups, like MyPlate, it is based on macro- and micronutrients.  This is handy for me because MyPlate "thinks" I am anemic and don't eat enough fish even though I am a healthy, athletic, vegan.  Users can adjust their macronutrient percentages to fit their needs, as for a diabetic person who closely monitors carbohydrates.

The food selection is much better on MyFitness Pal than on MyPlate.  Users can enter their own information from favorite recipes and foods.  The information is shared with the whole community which means I can get the exact information for the exact food I'm using, such as Aldi generic brands.

MyFitness Pal also tracks exercise, which is an important component of healthy weight management. I can burn 1000+ calories in a two-hour practice- nearly half of the calories I would consume on a non-derby day.

MyPlate has good traits too.  It is very straightforward for my students to use.  Most of my students come to my class without a knowledge of macronutrients, so MyFitness Pal would be too advanced for them.  I also like how visual the program is.  After students enter an item a graph changes to track their levels of each food group. It's a great program for beginners.

And, like it or not, MyPlate is the USDA standard for a healthy diet.  It is what textbooks follow, videos follow, and free classroom materials follow.  Simply said, it is just easier for teachers to use.

The project requirements have been adjusted, but my students and I are still upset with the wasted time.  One good thing has come from our debacle: We've had great conversations about the branches of the federal government. ;)


Tuesday, October 1, 2013

Eat This, Not That Posters

FriesThe documentary "Supersize Me" has been a popular film for FACS teachers to show their students.  Thankfully, however, it is out of date.  The film was released in 2004, nearly a decade ago.  Since then McDonald's has ended super size portions.  They have also introduced what I consider to be several healthy entrees.

Our Eat This, Not That posters help my students learn to find the healthy options when eating at their favorite restaurants.

We start by watching this fast food segment of Eat This, Not That from the Today Show. Then, students are grouped into pairs and assigned a restaurant.  The students search online to find nutrition facts from the restaurant (which, contrary to Supersize Me, are quite easy to find). They create two posters: One with a healthy meal and one with an unhealthy meal.  They tally total calories, total grams of fat and sugar, and total milligrams of sodium.

It is a very eye-opening project for the students.  They are happy to find that some of their favorite foods make a healthful choice.  They are also surprised to find that some of their favorites have many more calories than they realized.

The project is especially impactful if students know how many calories are allowed for someone of their age, sex, and size.  They realized that many of the "Not That" meals made up more than half of their total calories for a day.

This is one of my favorite activities from our nutrition unit.  It helps remind students that a healthy diet is not an all-or-nothing choice.

Monday, September 30, 2013

"M" Day for Homecoming Week: Mismatched Mess

Yes, the tights are plaid, too.
Grocery store employee: (As I was purchasing groceries for today's labs) Excuse me, are you a school teacher?
Me: Why yes, I am!
GSE: It must be homecoming week for you!
Me: Why yes, it is! I generally don't dress like this.

*Ha, ha, exchange pleasantries, have a nice day, etc*

Only until later did I question... What if I wasn't a teacher? :)

Some teachers use homecoming week as an excuse to wear sweatpants- I use it as an excuse to wear all of my vintage clothes.  Usually not this many outfits at once. :)

Tuesday, September 24, 2013

FACS Portion Sizing Lab Formative Assessment

On the day after the portion sizing lab, students review their math with a formative assessment.

A restaurant offers a 12 oz T-Bone steak.
  • If there are 240 calories per serving of steak, how many calories are in this steak? 
  • How many servings of meat are you consuming? 
You want to order the 5 Cheese Ziti Al Forno from Olive Garden.
  • If there are 1400 calories in this 12 oz dish, how many calories are in one serving? 
  • If you ate this whole dish, how many servings of pasta would you eat? 
This is a way for them to demonstrate their knowledge of pasta and meat serving sizes (4 oz, 3 oz) as well as practice the math they learned from the lab.

Follow my portion sizes Pinterest board!


Monday, September 23, 2013

FACS Portion Sizing Lab

In my classroom "DIET" is always a noun.  It is a normal thing that everyone has.  It can never be a verb: dietING goING on a diet, etc.  I encourage all students to adapt to a healthy diet, and understanding portion sizing is a very important part of that.

Students rotate between each of five stations, recording their portion size at each one.

  • Pasta: I boil a pot of pasta.  Students choose from a variety of plates and bowls to measure their serving by weight.
  • Steak: Using scratch paper, students cut out the size of what a "normal" steak looks like. When we go through the presentation I have the students estimate the size of their portion by tracing a playing card on their paper.
  • Soda: Students choose from a variety of take-out cups to fill with water.  They record their serving in fluid ounces.
  • Cheese: Students choose how many "dice" worth of cheese they would eat.
  • Cereal: Students choose from a variety of bowls to measure popcorn by cups.  I use popcorn instead of cereal because it is easiest to measure.
After all students have recorded their portion sizes we go through the presentation of nutrition labels.  Students record the serving size and calories of each food presented.

Then, using algebra, students calculate how much smaller or larger their portion size was.

For example,

One 12-oz can of soda has 160 calories.  A student measured a 22 oz portion.

160/12 = ?/22
160/12 = 13.33
13.33*22 = 293

So my student found out that their serving of soda had 293 calories!

It's always a big eye-opener for my students and a great reminder for me!

Follow my portion sizes Pinterest board!

Friday, September 20, 2013

DIY 100-Calorie-Packs For Teaching Calorie Density

Today my students made their own 100-calorie snack packs to better understand calorie density.

To set up the labs, I chose four snack foods.  I purchased enough for every kitchen group to have 100 calories. For example, I have 12 kitchen groups.  A bag of pretzels has 15 servings of 110 calories each, so there are 1,650 calories per bag. I needed just one bag. I chose Fruit Loops, pretzels, Reese's peanut butter cups, and peanuts. 

I divided my students into four groups of four students each and sent one group to each kitchen.  By reading the nutrition label, students calculated what 100 calories looks like.

Peanuts and Fruit Loops were calculated by grams.  Reese's and pretzels were calculated by piece.
Students were really bummed that 100 calories of peanuts was less than a handful: Only 16 grams!

See:

28 grams per 160 calories = 28/160 = .16 x 100 calories = 16 grams per 100 calories.

The bulk of their packs was made up of pretzels and Fruit Loops.  The group from the picture above had to return a few peanut butter cups.  Each group only got two!

The groups go to each kitchen collecting 100 calories of each food. The food is then divided into 4 packages so each student gets a 100-calorie package.

Afterwards we discussed how fat is a very concentrated form of energy.  Students can see that you can have a small amount of a high fat food, like peanuts, or a large amount of a high carbohydrate food, like pretzels.

Students who got the Reese's in their bag were consuming half of their calories in just one bite!

I learn so much from what I teach! How many of us have taken a handful (or several) of nuts for a snack? Or ate more than two Reese's peanut butter cups at a time? 

I had my students do this lab for the first time before testing it myself.  I had them re-check their math, because certainly there had to be more Reese's in 100 calories!  The students are always very surprised by this lab and it's a great reminder for me as well. 

Thursday, September 19, 2013

Small Appliances Demonstration: Microwaved Thanksgiving FACS Lab

After students learned how a microwave oven works with the Peeps Experiment and notes, they demonstrated their skills with a Thanksgiving feast.

The five kitchens each made a recipe and arranged them buffet-style for the other students to try.  This lab is always a hit and the students like to recreate the labs at home.  Teachers and associates frequently ask me to share the recipes.

Would you like the recipes? You can download my Google Doc of the recipes, lab evaluation, and reflection.

Somehow I was able to create this lab for each of my three classes for just $20!

Take advantage of all of the free produce in the teacher's lounge.
I am up to my eyeballs in zucchini this time of year so I was happy to share some with my students.

I also had a few leftovers from our knife skills lab.

Adjusting your labs to use seasonal produce will save your department money. My Food and Nutrition students may can tomatoes in the fall, but in the spring they could try rhubarb jam.  It teaches the same skills!


Wednesday, September 18, 2013

Peeps Microwave Experiment


Peeps of the World...Unite
Apparently the "Cinnamon Challenge" is (finally) losing its appeal and the new "thing" is to microwave peeps.  What a cool way to demonstrate how a microwave works!

Many people roll their eyes when I talk about teaching high school students to use a microwave.  I think it is very interesting! I have learned a lot from teaching this unit.  I learned that water is polarized and vibrates to move with the microwave radiation. I learned why foil starts fires, why closed containers explode, and why leftover pizza burns you even if the crust is cool. I love to learn the why behind things which is why the microwave unit is so fun.

If you are interested in a similar unit you can access my materials here:
Students perform the experiment of microwaving the peeps before I lecture or do notes.  After they understand more about how microwaves work students use the experiment to explain why their peeps changed in the pattern and way that they did.

We follow this experiment with our Microwaved Thanksgiving lab.  It is a favorite lab that students like to do at home.

Tuesday, September 17, 2013

School Straw Bale Gardening

April 14th "Straw Bale"It's true... I've been approved for a classroom food garden! I was offerred a space in the science wing of the building but turned it down so I would be able to supervise students.  Just recently I came across a technique using straw bales. I knew it was the right method for my students.

The bales will be lined along the outside wall of my classroom.  I will be able to supervise students from my windows.  We will be able to run a hose out of the window.

I will be searching for funding in the community.  Straw bales are fairly easy to come by in our area.  I expect that a local greenhouse would be happy to support the seeds and plants in exchange for a generous newspaper article.

I hope that we will have time in the spring to grown salad greens, herbs, and beets for my Culinary Essentials class.  We should have tomatoes ready for Food and Nutrition next fall. They can plant the fall garden for Term 2 Food and Nutrition with cabbage, turnips, radishes, and greens.

Has anyone else tried straw bale gardening or gardening for you classroom? An tips? Tricks?

Small Appliances Demonstration: Chocolate Waffle Cookies

What a delicious way to demonstrate a waffle iron! I made chocolate waffle cookies for my students.  Very few of them have a waffle iron at home, and if they do it is under-utilized.  A waffle iron makes cookies in 90 seconds as opposed to the preheat plus bake time of conventional cookies.
My third block class was ahead of the others and wanted to try ice cream.  I do not have an ice cream maker but use a food processor to make banana soft-serve.  It is just frozen bananas, a scoop of peanut butter, and a dash of milk processed with the "S" blade for about 2 minutes until light and fluffy.  It was like a banana split when paired with the chocolate waffle cookies!